28 December 2018

Tech Talk: Rohloff's "Through-Axle" A12 Hubs


In 2016, Rohloff introduced a new version of their renowned SPEEDHUB 500/14 14-speed internal gear hub that works with through axle frames. Dubbed the SPEEDHUB A12, Rohloff offers versions to fit frames with 12x142, 12x148, 12x177, and 12x197mm spacing. The SPEEDHUB A12 is nearly identical to the standard Rohloff SPEEDHUB 500/14, with the exception of how the hub connects to the frame.

A12 hubs mount to the frame with frame-specific adapters and custom bolts, so Rohloff requires that frames be verified for compatibility before they make the hub available for purchase. As a result, A12 hubs are always special order items, and delivery takes anywhere from a few weeks to a couple months.

This tech talk covers the details of the A12 system and provides instructions to guide you through the ordering process.

A12 hubs are NOT through-axle hubs!

With through axle frames, the defining interface dimensions for a rear hub are usually based around 2 measurements—the distance between the dropouts and the outer diameter of the axle. The combination of these two measurements provides a standard used by hub makers to ensure that hubs are easily interchangeable between different frames with the same dropout spacing. Most through axles on the market today feature a 12mm outer diameter, so hubs must include a 12mm hole through the center in order to accept the axles.

When riders first encounter Rohloff A12 hubs, most assume the hub is a true through axle version of the SPEEDHUB with a 12mm hole through the center. In reality, A12 hubs do not include a 12mm hole through the center but instead use a pair of 7mm bolts to secure the hub to the frame. These bolts are combined with a pair of adapters that reduce the openings in the frame dropouts from 12mm to 7mm.

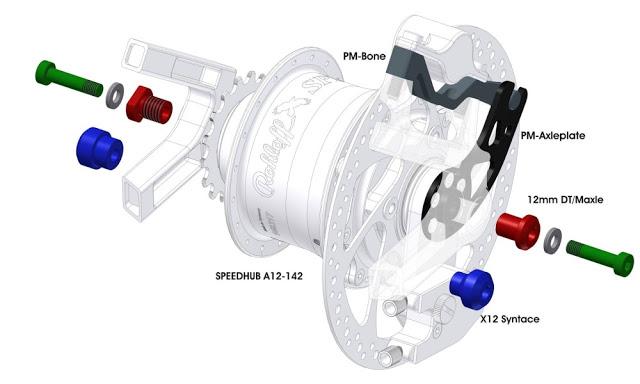
The pieces of the A12 system are shown in the image below. The red and blue pieces are inserts that reduce the openings in the dropouts from 12mm diameter to 7mm, and they will be sized specifically for compatibility with your dropouts and type of through axle. The green pieces are custom M7 bolts that hold the wheel into the frame, and the grey pieces are locking washers that keep the bolts from loosening. The ends of the hub are threaded to receive the M7 bolts, but the rest of the internals are identical to the original, quick-release or threaded axle SPEEDHUBs.


A12 versions use the same proven 14-speed gearbox that has transported riders to and from work, round-the-world tours, trail rides, and other self-powered (and increasingly motor-assisted) adventures for the past 20 years.

Why hasn’t Rohloff created a true through-axle version of the SPEEDHUB?


When Rohloff designed the SPEEDHUB in the mid-1990s, 5mm quick-release skewers were standard across the bike industry. The SPEEDHUB was designed around this standard and does not have space for a 12mm shaft to pass through the center.

It should be noted that at the time, it was revolutionary for an internal gear hub to have a quick release axle, and the SPEEDHUB remains the only internal gear hub on the market to offer this option (all others use a threaded axle with axle nuts). In order to fit a larger 12mm axle, the entire hub would need to be redesigned, which to-date Rohloff has been unwilling to entertain for a variety of reasons. Most importantly, creating space for a 12mm axle would likely lead to a larger and heavier hub because everything would need to scale in size around the axle increase, which is counter to the desire of most riders for a smaller, lighter hub.

A12 ordering process

Ordering an A12 hub is not a simple matter of placing the order and having it arrive a few days later.

First, dropout thicknesses need to be determined to ensure the parts will work together. Insertion depth of the mounting bolts is critical to proper functioning of the A12 system and must be standardized across all frames. Because dropouts vary in shape, thickness, axle capture method, and thread pitch between manufacturers—or even between models from the same manufacturer—Rohloff produces a variety of adapters to fit most frames.

Rohloff has devised a testing method to determine both whether a given frame’s dropouts are compatible with the A12 mounting bolts and which specific frame adapters will be required. Rohloff’s testing procedure measures thickness in two distinct ways and then compares the results to provide a double check. Cycle Monkey can complete this process in-house if dropouts or frames are sent to us, or send the Rohloff testing kit to dealers.

Once the dropouts have been measured, the results are submitted to Rohloff for review and approval, along with the frame's serial number. Upon approval, the hub can be added to our next bulk shipment, which occurs approximately every 2 months. We are also happy to ship hubs separately with an additional international shipping fee.

Note that each hub will be registered to an individual frame, and the warranty will be tied to exclusive use with that frame. Additional paperwork can be submitted for use with an additional frame(s).

Does your frame have Paragon sliding dropouts? Check out Paragon Inserts for A12 Hubs


For riders whose frames feature sliding dropouts that are compatible with Paragon’s inserts, Cycle Monkey has developed a solution that eliminates the need for the red and blue adapters shown above and allows you to slide the hub directly into the dropouts and secure it with just the A12 fixing bolts. These inserts have IS brake tabs for use in combination with our Monkey Bone and an OEM2 axle plate. Check them out over at Paragon (part #s DR4055, B4055, DR4056, B4056).

Ready to get started?

Despite the somewhat complicated ordering process, Cycle Monkey has helped multitudes of riders with through axle frames successfully enjoy the wide-ranging benefits of Rohloff’s SPEEDHUB. 

If you’d like to get started with the ordering process or have additional questions about the A12 system, please don’t hesitate to drop us a line or place an order.

Additional notes on A12 Hub drivelines and wheels:

- The driveline of the 12x142mm hubs is the same as the standard 135mm hubs.
- The driveline of the 12x148mm hubs is 3mm narrower than the 12x142mm or standard hubs and the wheel is dished 3mm towards the drive side. The entire 6mm of additional width between 142mm and 148mm hub spacing is located on the drive side of the hub to accommodate the SPEEDHUB shifting mechanism. This biases the hub 3mm the left of the bike’s centerline. As a result, the flange offset values are 33mm left side and 27mm right side.
- The driveline of all SPEEDHUB XL and XXL fat bike hubs is the same, so 10x170mm QR, 12x177mm A12, 10x190mm QR, and 12x197mm A12 have the same sprocket position. 190/197mm hubs have 10mm of extra axle length on either end compared to 170/177mm hubs.

13 December 2018

Classic Commuter: Rohloff-Equipped Rivendell Sam Hillborne


This classically-styled commuter belongs to a local Bay Area customer who was looking for the convenience and reliability of modern components like dynamo lighting and internal gearing for his vintage-inspired Rivendell Sam Hillborne frame. 


The project began with the desire for a Schmidt SON28 dynamo hub and Rohloff SPEEDHUB 500/14 internal gear hub. As a daily commuter, reliability, lack of maintenance, and ease of use were absolute requirements for every component of this build. Dynamo lighting from Schmidt fit the bill with its self-generating, no-charge-required illumination, and Rohloff’s SPEEDHUB was the clear choice for a wide-range drivetrain that would perform reliably day after day in any weather conditions. 
 
Built as a high-end commuter, the build was completed with top quality components in polished silver and brown leather to complement the nostalgic design of the lugged steel frame.


Rivendell is a Bay Area company located in Walnut Creek, just down the road from Cycle Monkey. Their calling card is lugged steel frames, and they offer a variety of platforms for daily commuting, road riding, trail riding, and touring. Rivendell is a small company, and they pride themselves on taking a different approach to frame materials and construction than most contemporary builders:

All of our bikes have lugged steel frames. We believe it's the best and most beautiful way to make bicycle frames, and trends won't sway us. We don't sell bikes for racing, and rather than apologize for that, we'd like to point out that since we are unburdened by racing values, we're free to design better-than-racing bikes. Bikes that fit better, ride better, and are more comfortable. Bikes that let you carry a load, whether that load is a tent and camping gear, a computer and files, or groceries. Our bikes are safe, comfortable, practical, and beautiful. Racing bikes might be lighter, but they are less comfortable, less useful, and for the most part, harder to like the looks of - Rivendell Bicycles

Rivendell's aesthetic and design choices might fall outside the norm, but their commitment to this unique approach is unwavering, and their execution of classic steel frames is second-to-none.

Rivendell presents the Sam Hillborne an all-rounder road bike packed with style and value. Clearance for 40mm tires provides the flexibility to comfortably take on dirt road adventures, while rack and fender mounts provide easy set up for commuting and errands. Add the Rohloff SPEEDHUB 500/14 and self-powered lights, and the Sam Hillborne is quickly transformed into the ultimate commuter.


Cycle Monkey's Wheel House assembled a pair of eye-catching wheels with polished-silver hubs, Pacenti PL23 rims, and double butted Sapim Race spokes with brass nipples. The highlight, of course, is the Schmidt SON28 dynamo hub. Providing self-powered lighting of both the front and rear lights that help riders stand out in traffic and light the road ahead, dynamo lights are a no-brainer for commuters like this customer.


The Rohloff SPEEDHUB 500/14 internal gear hub is an excellent option for any commuter because of its durable, hardened steel internal gear wheels, wide gear range, and sealed shifting system, which protects shifting components from everyday wear and tear. The SPEEDHUB provides long-term dependability in all riding conditions, making it the perfect drivetrain choice for a bike that is relied on for daily transport. 


Rivendell does not design frames with Rohloff-specific or disc brake compatibility, so this build required an aftermarket SPEEDHUB setup that will work with virtually any standard frame.  

The torque arm connected to the left chainstay fixes the hub axle to the frame and prevents it from spinning while the rider is pedaling. Chain tension comes courtesy of Phil Wood's Philcentric thread-in eccentric bottom bracket, which also allows for a small range of tension adjustment. In the end, this setup functions the same as bikes designed specifically around the SPEEDHUB.


Cycle Monkey completed the classic commuter build with high-end components from Chris King, Nitto, Paul Components, Gilles Berthoud, and Brooks, all of which contributed to the desired aesthetic. 


This build demonstrates the possibilities when you take a beloved frame designed for traditional drivetrain components and build it up around a Rohloff SPEEDHUB 500/14. Cycle Monkey relished the opportunity to put together a build kit that inspired this customer ride his Rivendell and brought more enjoyment to his daily commute.

If you have a stock frame and want to run a Rohloff SPEEDHUB or make you frame belt drive compatible, just give us a call.  We'd be thrilled to talk it through and help you get the process rolling.

Build details

• Frame: Rivendell Sam Hillborne
• Fork: Rivendell Sam Hillborne
• Headset: Chris King Threaded
• Stem: Nitto Technomic
• Handlebar: Nitto Albatross
• Shifter: Gilles Berthoud for Rohloff SPEEDHUB 
• Grips: Brooks
• Seat post: Nitto Dynamic
• Saddle: Brooks B67
• Seat Clamp: Seat binder 
• Front Hub: Schmidt SON28
• Rear hub: Rohloff SPEEDHUB 500/14
• Spokes: Sapim Race
• Nipples: Sapim Brass
• Rims: Pacenti PL23
• Tires: Surly Knard 700 x 41c
• Cranks: Middleburn RS8
• Pedals: MKS Sylvan
• Bottom Bracket: Phil Woods Philcentric
• Chain ring: Middleburn RS7
• Rear Sprocket: Shimano 39T single speed ring
• Chain: Wippermann 8sX
• Brakes & Levers: Paul Racer
• Torque Arm: Rohloff
• Front Light: Schmidt Edelux II
• Rear Light: Schmidt SON Taillight
• Fenders: SKS Longboard  
• Rear Rack: Tubus Logo Evo 

07 December 2018

Gates Carbon Drive: There's an app for that...

Not sure what size belts or sprockets you need for Gates Carbon Drive? Their handy app can help...
Belt drive systems from Gates Carbon Drive offer a multitude of advantages over traditional, chain-driven drivetrains: Belts do not rust or require lubrication, offering year-round reliability with minimal mess and virtually no upkeep. You can simply wipe ‘em down after a messy ride and immediately be ready to roll again—no chain cleaner or removal necessary. Belts also last 5-10x longer than most chains and don’t stretch. As a result, belts and sprockets tend to wear at the same (significantly slower) rate. The lack of belt stretch also means that belt tension typically does not require adjustment over the entire life of the belt. Set and forget!

So, what do you need to know to run one yourself?

Gates Carbon Drive systems contain three essential components: a front sprocket, rear sprocket, and the belt itself. There’s a huge range of sprocket interfaces and belt lengths available, and here at Cycle Monkey, we often field questions from riders wondering about compatibility with their current bike or the best choices for a custom build project. Many of these questions relate to sprocket sizes and belt length.


Luckily, Gates has created a handy app for mobile and web that’s incredibly helpful in answering these types of questions. To get started, all you need to know is your desired gear ratio and the minimum and maximum effective chainstay lengths for the frame you’ll be working with.

Gear ratio is the final drive ratio you’d like to achieve, and is calculated as front sprocket size divided by rear sprocket size, so that a drivetrain with equally sized front and rear sprockets has a ratio of 1 (ex. 32 Tooth Front / 32 Tooth Rear = 1 / 1 = Gear Ratio of 1. Smaller gear ratios make it easier to climb hills, while larger gear ratios offer a higher top speed and prevent you from spinning out at too high a cadence once you get up to speed. If you live in a hilly area or are a mountain biker, you’ll want to consider a smaller ratio. Stronger riders or those primarily riding on flat ground will benefit from a larger one.

Riders accustomed to calculating gear ratios with their chain-driven setups will be pleased to hear that this ratio calculation is the same. The number of teeth on belt sprockets will typically be greater, but gearing will be the same as long as the ratio is maintained.

Effective chainstay length refers to the distance from the center of the bottom bracket to the center of the rear axle. Belt-driven bicycles require this length to be adjustable in to apply proper belt tension and account for different gear ratios. As a result, belt-compatible frames have a range of chainstay length, rather than a single value like that you’d typically see on a manufacturer’s geometry chart. This adjustability is achieved with adjustable rear dropouts, an eccentric bottom bracket, or horizontal dropout slot lengths.

Sliding rear dropouts are one way to achieve the flexibility in chainstay length that's required by belt systems 
Once you’ve determined these two values, you can use the Gates calculator tool to determine which sprocket sizes will provide your desired gear ratio, along with the correct belt length. If you get stuck, feel free to drop us a line at info@cyclemonkey.com, and we’ll be happy to give you a hand.

The interface differs slightly between the mobile and web apps. Generally speaking, the web app is easier to use if you’re trying to determine which components are compatible with your bike, while the mobile app allows you to explore the gear ratio and compatible chainstay lengths of the various sprocket/belt combinations more quickly.

On the web: Enter your desired gear ratio (or front and rear sprocket sizes) along with your chainstay length (in mm), and select the “Find Solutions” box. From there, you’ll receive a complete list of sprocket and belt combinations that will fit your needs. They’re organized from top-to-bottom in terms of compatibility.

On mobile: You’ll see three columns on the mobile app which allow you to scroll between various sizes for the front sprocket, rear sprocket, and belt. The “center distance” (chainstay length) and gear ratio will be displayed below for any given combination. From there, you can select the “catalog” tab in the bottom navigation to find sprockets and belts in the sizes you’re looking for. The mobile app also features a nifty belt tension meter that measures sound waves with your phone’s microphone to evaluate belt tension!


If you’d like to further refine your search based on desired wheel/tire size and crank length, the “advanced options” selection on both interfaces will allow you to do so.

There are a few additional considerations when it comes to building your ideal Gates Carbon Drive system, As mentioned above, belt systems require some degree of flexibility when it comes to chainstay length or “center distance” in order to properly install and tension the belt. If you plan on only running one gear ratio throughout the life of your bike, you’ll need a 12mm range of movement at a minimum. If you want to experiment with different sized sprockets and gear ratios, Gates recommends a 25mm range of movement. 

You’ll also need to make sure that the front sprocket you select is small enough to clear the frame/chainstay. Note that belt sprockets are wider than chain sprockets, and that you’ll need at least 2mm of clearance between the sprocket and chainstay. Some crafty guesswork with a ruler can go a long way in determining whether or not the sprocket size you’ve selected will clear your frame.

Of course, you’ll need to select sprockets with the correct interface for your bottom bracket and rear hub. Unless you plan to go singlespeed, you’ll need to run an internal gearing system, such as Rohloff’s SPEEDHUB 500/14 internal gear hub or Pinion’s gearbox. These systems share many benefits with Gates Carbon Drive, including a low maintenance burden, ease-of-use, and incredible durability.

Of course, adding multiple gears into the equation with an internal gearing system means that you’ll have more than one gear ratio to consider when selecting sprockets. If you’re interested in a more detailed comparison of gearing between derailleurs and these internal systems, check out our posts on Calculating Gear Ratios with Rohloff Hubs and Calculating Gear Ratios with Pinion Gearboxes. If you’d like to compare systems, check out this helpful online bicycle gear calculator.

At Cycle Monkey, we love to help riders navigate the process of retrofitting an existing bike or bring their vision to life with a custom build. If you’re curious about running a Gates Carbon Drive system yourself, don’t hesitate to give us a shout!

Find the web app here
Download the mobile app from the Apple and Android App Store.

Calculating Gear Ratios with Rohloff Hubs


New Rohloff users often find themselves wondering which size front or rear sprockets to use with a SPEEDHUB 500/14 or how to compare different Rohloff gearing setups with a derailleur bike. Rohloff gearing can be easily compared to external gearing using the internal gear ratios for the SPEEDHUB and the size of the front and rear sprockets.

Here is what you need to do:

Multiply the external (primary) gear ratio (front sprocket tooth count divided by rear sprocket tooth count) by the internal gear ratio (from the chart below) to get the overall ratio for a given gear selection. This overall gear ratio can then be compared directly with a specific derailleur or single speed gear combination, assuming the same wheel size and crank length are being used. If those factors also differ between the two bikes you are comparing, see below for additional resources offering more in depth drivetrain comparisons.

In practice, comparing the high and low gears is usually sufficient to determine whether a given set up will provide the climbing and descending gears you desire. Note that this calculation is the same whether you are running a chain or a belt.

If you are not familiar with the concept of gear ratios, the articles below provide helpful background information:

https://adventure.howstuffworks.com/outdoor-activities/biking/bicycle4.htm

https://cyclingtips.com/2017/11/understanding-bicycle-gear-ratios-why-they-matter/

This chart shows the internal ratio for each of the 14 gears on a SPEEDHUB:

Gear #
Internal Ratio
1
0.279
2
0.316
3
0.360
4
0.409
5
0.464
6
0.528
7
0.600
8
0.682
9
0.774
10
0.881
11
1.000
12
1.135
13
1.292
14
1.467


The overall gear range of the SPEEDHUB is 526% (1.467/0.279), which is quite wide, and wider than most current derailleur systems. This means that there is a larger difference between the easiest and hardest gears when using a Rohloff hub compared to most derailleur-equipped bikes. You can choose weather the additional range is on the high end, low end, or split the difference based on the choice of front and rear sprocket sizes.

Calculating High and Low Ratios on your Rohloff


As an example, let's assume you have set up your new Rohloff-equipped bike with a 40T front sprocket and a 16T rear sprocket. Your external (primary) gear ratio with such a setup would be 2.5 (40/16=2.5). Looking at the chart above, we can see that the internal ratio is 0.279 for gear #1 and 1.467 for gear #14. If you multiply the primary gear ratio by the internal ratios for the highest and lowest gears, you get the following high and low ratios:

Highest ratio: 2.5 * 1.467 = 3.668
Lowest ratio: 2.5 * 0.279 = 0.698

These numbers can now be compared directly to the ratios of derailleur gear combinations to compare the hardest and easiest gears.

Calculating Ratios with Derailleur Systems: 1x11 Example

Assume you have a 1x system with a 30T front sprocket and a 10-42T cassette. This setup provides 420% overall gear range range (42/10), which is less than Rohloff's 526%. To calculate the high and low ratios with a derailleur system, simply divide the front sprocket tooth count by that of the largest and smallest cassette sprockets. In this case, we get the following high and low ratios:

Highest ratio: 30/10 = 3.000
Lowest ratio: 30/42 = 0.714

Comparing these numbers against the Rohloff Example above, the Rohloff setup offers both a harder/faster gear (3.668 vs 3.0) and an easier/slower gear (0.698 vs 0.714) than the derailleur system.

So, how do all of these numbers affect your choice of sprockets with the Rohloff?

If you felt the high gear on the derailleur setup was fast enough (3.000) and wanted an easier climbing gear, decreasing the front sprocket size on the Rohloff system from 40T to 33T (2.063 primary ratio) would match the high ratio of the derailleur setup and decrease the low ratio to 0.575. If the low gear on the derailleur setup was easy enough (0.714 ratio) and you wanted more top end gearing, increasing the front sprocket size on the Rohloff system to 41T (2.563 primary ratio) would match the low ratio of the derailleur setup and increase the high ratio to 3.759.

Another Example: Comparing Rohloff to 1x12 Derailleur System

Assume you have a 1x system with a 30T front sprocket and a 10-50T cassette. This gives you 500% overall gear range (50/10)—still less than Rohloff's 526%. Using the method outlined above, we reach the following high and low ratios:

Highest ratio: 30/10 = 3.000
Lowest ratio: 30/50 = 0.6

Comparing these numbers against the Rohloff example above, the Rohloff setup offers a harder/faster gear (3.668 vs 3.0) but not as low of an easiest/slowest gear (0.698 vs 0.6) compared to the derailleur system.

If the high gear on the derailleur setup was fast enough (3.000) and you wanted an easier climbing gear, decreasing the front sprocket size on the Rohloff system to 33T (2.063 primary ratio) would match the 3:1 high ratio of the derailleur setup while also decreasing the low ratio of the Rohloff system to 0.575 (vs the 0.6 ratio of the 30/50T derailleur combination).

If the low gear on the derailleur setup was too low and you wanted more top end gearing, increasing the front sprocket size on the derailleur system to 35T would match the low ratio of the Rohloff setup (0.698) and increase the high ratio of the derailleur system to 3.5.

One More Example:

Assume you have a 3x system with 24/34/48T front sprockets and an 11-32T cassette. This gives you a 582% overall gear range ([48/24] * [32/11]), which is wider than the range of the Rohloff hub, and results in the following high and low ratios:

Highest ratio: 48/11 = 4.364
Lowest ratio: 24/32 = 0.75

In this example, the derailleur system offers a harder/faster gear (4.364 vs 3.668) and the Rohloff system offers an easier/slower gear (0.698 vs 0.75). If the low gear on the derailleur setup was easy enough (0.75 ratio) and you wanted more top end gearing, you could increase the front sprocket size on the Rohloff system to 43T (2.688 primary ratio) to match the low ratio of the derailleur setup and increase the high ratio to 3.943. If you wanted to match the high gear of the derailleur system (4.364), you would need to increase the front sprocket size to 48T (3.000 primary ratio) to match the high gear on the derailleur system, which would also increase the low ratio to 0.837.

In practice, you are often limited by available sprocket sizes and will need to adjust slightly (maybe 43T is not available so you have to choose 42T or 44T), but there are generally enough sprocket sizes available to achieve just about any combination that is practical for cycling.

General Recommendations


If you are not sure where to start, here is a general reference list based on primary gear ratio. You may want to adjust these recommendations for rider strength/fitness, terrain, and cargo load, but they are a good starting point for those new to using a Rohloff SPEEDHUB 500/14.

1.9-2.3*: Mountain biking, fat biking, more heavily-loaded off-road touring
2.1-2.5*: Off-road bikepacking
2.4-2.6: On-road touring
2.5-2.75: On-road bike packing, commuting, gravel riding
2.75-3: Road, faster/more fit gravel rider
>3-3.4: Faster/more fit road rider

* Note that Rohloff stipulates that riders over 100kg (221lbs) must use a 2.5 primary ratio to maintain their warranty. All tandems and e-bikes also fall into this category.

Online Tools

Online gear ratio calculators are useful for determining which size sprockets to use with the Rohloff SPEEDHUB 500/14. They are programmed to provide gearing information for Rohloff, derailleurs, and other internal systems (gear hubs and gearboxes), and can also be used to compare gearing between bikes with different size wheels and/or crank arms in case you are considering a new bike with an entirely new configuration. Here are a couple that we recommend:

http://www.sheldonbrown.com/gear-calc.html
http://ritzelrechner.de/

We are Here to Help


At Cycle Monkey, we love to help riders gain a better understanding of the components and equipment they are riding on, empowering them to experiment and tinker with their riding setups like we love to. If you have any questions about gearing, sprocket selection, or a custom bike build, drop us a line. If this guide was helpful, we also want to hear from you! Let us know on our Facebook page.

Calculating Gear Ratios with Pinion Gearboxes


New Pinion users often find themselves wondering which size front or rear sprockets to use with their Pinion gearbox, or how to compare Pinion gearing setups with a derailleur bike. Pinion gearing can be easily compared to external gearing using the internal gear ratios for the gearbox and the size of the front and rear sprockets.

Here is what you need to do:

Multiply the external (secondary) gear ratio (front sprocket tooth count divided by rear sprocket tooth count) by the internal gear ratio (from the chart below) to get the overall gear ratio for a given gear number. This overall gear ratio can then be compared directly with a specific derailleur or single speed gear combination, assuming the same wheel size and crank length are being used. If those factors also differ between the two bikes you are comparing, see below for additional resources.

In practice, comparing the high and low gears is usually sufficient to determine whether a given set up will provide the climbing or descending gear you desire. Note that this calculation is the same whether you are running a chain or a belt.

If you are not familiar with the concept of gear ratios, the articles below provide helpful background information:

https://adventure.howstuffworks.com/outdoor-activities/biking/bicycle4.htm

https://cyclingtips.com/2017/11/understanding-bicycle-gear-ratios-why-they-matter/

This chart shows the internal ratio for each of the available gears in the various gearboxes:


Internal Ratio
Gear Number
P1.18
P1.12/C1.12
P1.9 XR/C1.9XR
P1.9 CR
P1.6
1
0.55
0.55
0.55
0.77
1.05
2
0.61
0.64
0.68
0.90
1.32
3
0.68
0.76
0.84
1.05
1.61
4
0.76
0.89
1.05
1.23
2.04
5
0.84
1.05
1.32
1.45
2.50
6
0.94
1.23
1.61
1.69
3.13
7
1.05
1.45
2.04
2.04

8
1.18
1.72
2.50
2.38

9
1.32
2.04
3.13
2.78

10
1.45
2.38


11
1.61
2.78


12
1.82
3.33


13
2.04


14
2.27


15
2.50


16
2.78


17
3.13


18
3.45


Overall Range
628%
607%
569%
361%


Calculating High and Low Rations on your Gearbox: 12-Speed Pinion Example

As an example, assume you are running a 30T front sprocket and a 30T rear sprocket. This gives you a secondary gear ratio of 1 (30/30 = 1). Looking at the chart above, the internal ratio is 0.55 for gear #1 and 3.3 for gear #12. If you multiply the internal gearbox ratio by the secondary ratio for the highest and lowest gears, you get the following high and low ratios:

Highest ratio: 1 * 3.33 = 3.33
Lowest ratio: 1 * 0.55 = 0.55

These numbers can now be compared directly to the ratios of derailleur gear combinations.

Calculating High and Low Ratios with Derailleur Systems: 1x11 Example

Assume you have a 1x derailleur system with a 30T front sprocket and a 10-42T cassette.  This setup gives you 420% overall gear range range (42/10), which is less than the 600% range of the 12-speed Pinion gearbox.

To calculate the high and low ratios with a derailleur system, simply divide the front sprocket (chain ring) tooth count by that of the rear (cassette plate). In this case, we get the following high and low ratios:

Highest ratio: 30/10 = 3.000
Lowest ratio: 30/42 = 0.714

So, how do these numbers help you select sprockets for your new Pinion setup? A simple comparison will go a long way.

Comparing these numbers against the Pinion example above, the Pinion setup will offer both a harder/faster gear (3.33 vs 3.0) and an easier/slower gear (0.55 vs 0.714) compared to the derailleur system. If the high gear on the derailleur setup was fast enough (3.000) and you wanted an easier climbing gear, decreasing the front sprocket size on the gearbox to 27T (0.901 secondary ratio) would match the high ratio of the derailleur setup and decrease the low ratio to 0.495.  If the low gear on the derailleur setup was easy enough (0.714 ratio) and you wanted more top end gearing, increasing the front sprocket size on the gearbox to 39T (1.30 secondary ratio) would match the low ratio of the derailleur setup and increase the high ratio to 4.33.

Another Example: Comparing Pinion to a 1x12 Derailleur System

Assume you have a 1x derailleur system with a 30T front sprocket and a 10-50T cassette.  This setup gives you 500% overall gear range (50/10), which is less than the 600% range of the 12-speed gearbox, and the following high and low ratios:

Highest ratio: 30/10 = 3.000
Lowest ratio: 30/50 = 0.6

Comparing these numbers against the Pinion example above, the Pinion setup will offer both a harder/faster gear (3.33 vs 3.0) and an easier/slower gear (0.55 vs 0.6) compared to the derailleur system.  If the high gear on the derailleur setup was fast enough (3.000) and you wanted an easier climbing gear, decreasing the front sprocket size on the gearbox to 27T (0.901 secondary ratio) would match the high ratio of the derailleur setup and decrease the low ratio to 0.495.  If the low gear on the derailleur setup was easy enough (0.6 ratio) and you wanted more top end gearing, increasing the front sprocket size on the gearbox to 33T (1.09 secondary ratio) would match the low ratio of the derailleur setup and increase the high ratio to 3.633.

One more example: 

Assume you have a 3x system with 24/34/48T front sprockets and an 11-32T cassette.  This gives you 582% overall gear range ([48/24] * [32/11]), which is less than the 600% range of the 12-speed gearbox, and the following high and low ratios:

Highest ratio: 48/11 = 4.364
Lowest ratio: 24/32 = 0.75

In this example, the derailleur system will offer a harder/faster gear (4.364 vs 3.33) and the gearbox will offer an easier/slower gear (0.55 vs 0.75).  If the low gear on the derailleur setup was easy enough (0.75 ratio) and you wanted more top end gearing, you could increase the front sprocket size on the gearbox to 41T (1.364 secondary ratio) to match the low ratio of the derailleur setup and increase the high ratio to 4.54.  If you wanted to match the high gear of the derailleur system (4.364), you would need to increase the front sprocket size to 39T (1.31 secondary ratio) to match the high gear on the derailleur system, which would also increase the low ratio to 0.721.

In practice, your choices may be limited by available sprocket sizes and you might need to adjust accordingly (maybe 43T is not available so you have to choose 42T or 44T). That said, there are generally enough sprocket sizes available to achieve just about any combination that is practical for cycling.

General Recommendations

If you are not sure where to start, here is a general reference list, here is a general reference list based on secondary gear ratio. You may want to adjust these recommendations for rider strength/fitness, terrain, and cargo load, but they are a good starting point for those new to internal gearing or singlespeed:

0.95-1.2: Mountain biking, fat biking, more heavily-loaded off-road touring
1.05-1.25: Off-road bikepacking
1.1-1.3: On-road touring
1.2-1.4: On-road bike packing, commuting, gravel riding
1.3-1.5: Road, faster/more fit gravel rider

Online Tools

Online gear ratio calculators are also useful for determining which size sprockets to use with the Rohloff SPEEDHUB 500/14. They are programmed to provide gearing information for Rohloff, derailleurs, and other internal systems (gear hubs and gearboxes), and can also be used to compare gearing between bikes with different size wheels and/or crank arms in case you are considering a new bike with any entirely new configuration. Here are a couple that we recommend:

http://www.sheldonbrown.com/gear-calc.html

http://ritzelrechner.de/

We are Here to Help

At Cycle Monkey, we love to help riders gain a better understanding of the components and equipment they are riding on, empowering them to experiment and tinker with their riding setups like we love to. If you have any questions about gearing, sprocket selection, or a custom bike build, drop us a line. If this guide was helpful, we also want to hear from you! Let us know on Facebook.